Database Management System (DBMS) using MS Access 2010
- Other Laws|Blog|
- 18 Min Read
- By Chetan Kulasri
- |
- Last Updated on 18 July, 2024
Latest from Taxmann

Table of Contents
1. Introduction
4. Understanding MS Access window
Checkout Taxmann's Basics of Computer Applications in Business which is a comprehensive & authentic textbook written to impart computer skills and knowledge to commerce students & enhance their understanding of information technology tools in handling business operations. The book's focus is on the application part while providing basic information about computers for first-time readers.
1. Introduction
MS Access 2010 is a DBMS application package that supports implementing the database. If you can recall a database is a collection of information that’s related. MS Access allows you to manage the information in one database file. It collects data that is stored in a computer system. It allows the users to enter, access, and analyze the stored data quickly and easily.
The data can also be stored in tables using MS Excel 2010 and can be managed as Excel is also great at storing and organizing the numbers. Still we need MS Access as it is far stronger at handling non-numerical data, like names and descriptions that play a big role in almost any database. Access is able to sort and analyze the non-numerical data also. Not only this, Access is much stronger as a tool for data management, as it is able to implement connectivity between the objects. Access is a relational database management system that is able to understand how lists and the objects within the database are linked and to relate them with one another.
The fact that relational databases can handle information by allowing the users to enter, search, and analyze data in more than one tables at a time, it makes stronger tool for data analysis than Excel. In Access, even complicated tasks can be simplified and can be made fairly user-friendly.
MS Access has certain capabilities, which bring it closer to an ideal Database Management System. These capabilities are:
-
- Storing the data in an organized manner
- Enforcing data integrity constraints
- Representing complex relationship among data
- Providing for persistent storage of database objects
- Restricting unauthorized access to database
- Allowing fast retrieval of data with or without processing by using SQL.
- Flexibility to create multiple user interfaces.
- Providing for data sharing and multi-user transaction processing.
- Supporting multiple views of data and information.
This chapter emphasizes upon the different objects Tables, queries, forms and reports of MS Access. However, you are suggested to refer Chapter number 4 of the book entitled “Fundamentals of Computers and Information System” before proceeding to this chapter for better understanding.
2. Objects in MS Access 2010
There are four main objects in Access 2010:
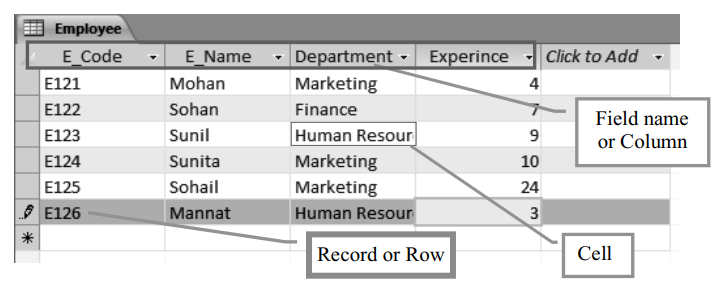
1. Tables: This object class allows a database designer to create the data tables with their respective field names, data types and the data properties to store the data. It is used to store the data in the database. In Access, rows are referred to as Records and the columns are referred to as Fields (attributes).
A record represents a unit of information. Every cell in a given row is part of that row’s record. Every piece of information store within a field is of the same type. For example, every entry in a field called “First Name” would be a name, and every entry in field called “Phone_Number” would be a Phone number, ask questions about information stored in your tables
2. Queries: This object class is meant to create the SQL compatible query statement with or without the help of GUI to define tables, store data and retrieve both data and information. It is used to make ad hoc queries about the information stored in your tables. A Query is able to pull information from multiple Tables and allows the users to limit the records (rows) display by using certain criteria and showing only the fields (columns) that meet the specified criteria by the user.
3. Forms: This object class allows the designer to create an appropriate user interface to formally interact with the tables and the queries. It allows the users entering, modifying, and viewing records view i.e. the data stored in the tables.
4. Reports: This object class is used to create various reports, the source of information content of which is based on tables, queries or both. Such reports are designed in Access according to the requirement of the end-user. It offers the users the ability to present the data stored in the tables in print. The fee slips or the train tickets that you receive are examples if the reports. The reports can be customized to make its appearance to make it visually appealing. Access offers the ability to create a report from any table or query.
Together, these objects allow the users to enter, store, analyze, and compile the data.
3. Creating Database
To create a database
1. Go to Start
2. Click on All Programs
3. Go to Microsoft Office 2010
4. Click on Microsoft Access 2010
The following screen will appear to you
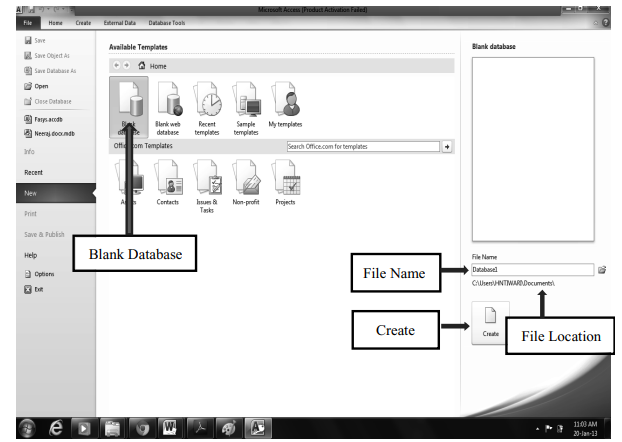
5. By default MS Access will select Blank Database option, with Database followed with some number as database name and My Documents as default Storage Location. Change the name by typing in the box and then provide the storage location, by clicking on the yellow folder sign available against the naming box, as per the situation.
6. Click on Create.
After you click Create the database is created and the next step remains to design the database.
If you wish to create a new database either Press Ctrl+ N or go to File Tab and click New Unlike MS Word and MS excel in which first you can design the document and then save, in MS Access you first save the database and then design the database.
4. Understanding MS Access window
After you create the database the following window appears to you.
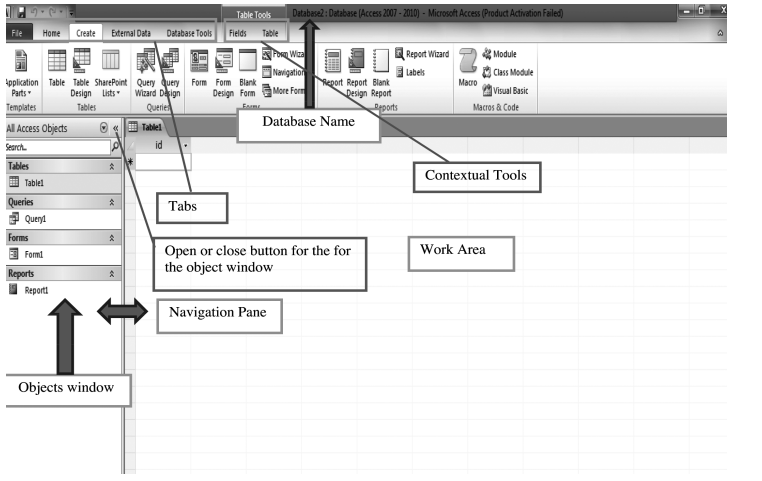
Just like Word and Excel the ribbon in Access also contains multiple tabs like Home, Create, External data and Database tools each of which is further divided into groups. By now we are presuming that you know handling these groups. But whenever something new will appear the same will be discussed in the chapter. Out of the tools available the contextual tools Field and Table appear only when some Table object is selected.
If you double click on << button it minimizes (closes) the Navigation Pane and if the navigation pane is closed then double clock on >> to maximizes (opens) it.
5. Creating tables
MS Access 2010 by default provides with a table in the object list. To customize/design the default table as per your schema:
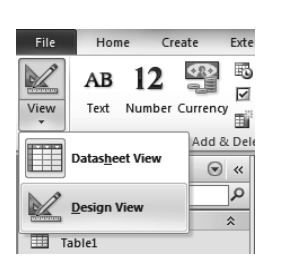
Right click on the table and select Design View
Or
Click on View and then select Design View
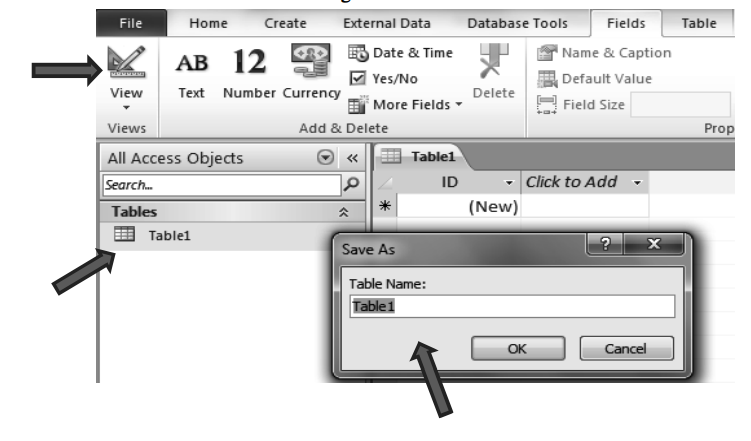
It will require a table name. Enter the table name and click on OK or press Enter.
To create more tables in the database click on Create tab and select Table Design under the Table group. This result in providing a Table Design window, the upper part of which has three columns: Field Name, Data Type and Description. It is meant to define the schema of a table being created. Each of its rows corresponds to a column of the table to be created. Two primary properties of the column of a table are its field name and the data type.
Field name refers to the column name of the table being created. The name of the column should be a string of contiguous characters. The Field name is meant to define the name of column to be created, followed by data type of such column. Once the data type is defined, the designer can further specify the properties of each column in the lower part of the Table window.
Data Types: Access supports different data types, the details of which are as given below:
-
- Text: It is used for a string of characters: words or numbers that are not to be used in any arithmetic calculations. The maximum length for a text field is 255 characters. It is the default data type because of being used most frequently.
- Memo: It is used for storing comments and is capable of accommodating 65,536 characters. But a field with this data type is not amenable to sorting or filtering of data records.
- Number: It is meant to store numbers, which could be integers (-32768 to 32767), long integers (–2,147,483,648 to 2,147,483,647), bytes( 0-255), single (to store values with decimal point up to a certain limit), double (to store values in decimal point with greater magnitude and more precision) or decimal types. For more details refer the following figure that is available at the help menu of MS Access.
|
Setting |
Description |
Decimal |
Storage size |
| Byte | Stores numbers from 0 to 255 (no fractions). | None | 1 byte |
| Decimal | Stores numbers from–10^38–1 through 10^38–1 (.adp)
Stores numbers from–10^28–1 through 10^28–1 (.mdb, .accdb) |
28 | 2 bytes |
| Integer | Stores numbers fro–32,768 to 32,767 (no fractions). | None | 2 byte |
| Long Integer | (Default) Stores numbers from–2,147,483,648 to 2,147,483,647 (no fractions) | None | 4 byte |
| Stores numbers from | |||
| Single | –3.402823E38 to –1.401298E–45 | 7 | 4 byte |
| for negative values and from | |||
| 1.401298E–45 to 3.402823E38 for positive values. | |||
| Stores numbers from | |||
| Double | –1.79769313486231E308 to – 4.94065645841247E–324 | ||
| for negative values and from | 15 | 8 bytes | |
| 4.94065645841247E–324 to 1.79769313486231E308 for positive values. | |||
| Replication ID | Globally unique identifier (GUID) | N/A | 16 bytes |
-
- Date/Time: It is used to store dates, times or a combination of both.
- Currency: It is used for storing numbers in terms of Dollars, Rupees or other currencies.
- Auto Number: It is a numeric data automatically entered by Access. It is of particular importance in a situation where none of the fields individually or a set of fields as a combination in a table is unique.
- Yes/No: It is to declare a logical field which may have only one of the two opposite values alternatively given as: Yes or No, On or Off, True or False.
- OLE Object: OLE stands for Object Linking and Embedding. It refers to an object that could be a photograph, bar code image or another document created in another software application.
- Hyperlink: This data type is meant to store a Universal Resource Locator (URL) and e-mail addresses in the database.
- Attachment: This data type can attach images, spreadsheet files, documents, charts, and other types of supported files to the records in the database just like one can attach files to e-mail messages. It also allows viewing and editing the attached files, depending on how you have set up the Attachment field. Attachment fields provide greater flexibility than OLE Object fields, and they use storage space more efficiently because they don’t create a bitmap image of the original file.
- Lookup Wizard: This data type creates a field that allows the user to choose a value from another table or from a list of values by using a list box or combo box. Clicking this option starts the Lookup Wizard, which creates a Lookup field (Lookup field: A field, used on a form or report in an Access database, that either displays a list of values retrieved from a table or query, or stores a static set of values.). After you complete the wizard, Microsoft Access training sets the data type based on the values selected in the wizard.
Description: It provides a brief description of the field name entered. The designer can optionally provide description of the column.
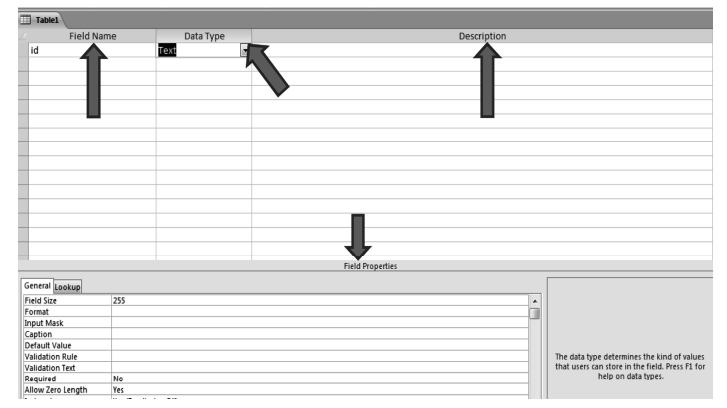
Field Properties: Once the data type of a column is specified, Access allows the designer to define the properties of each column. These properties are of two types: General and Look up.
General Properties: In the context of the text data type the general properties are:
-
- Field Size: This property, in case of text fields, refers to the maximum number of characters allowed in the column. The same property, in case of numbers, refers to the type of numbers being stored as per requirements.
- Format: It is meant to indicate as to how the field’s contents are displayed. There are standard types of formats to choose from.
- Decimal places property: It applies to Single, double or decimal types of numbers.
- Input mask: Formats for data entry that include place holders and punctuations are called input masks. It works only for text and numeric and date type of fields. It is of particular importance when the data to be used in the system are formatted with hyphens.
- Caption: It is a label used for the field in datasheet view and on the Forms and reports. If the caption property is set to blank, the field name entered at the time of designing database becomes the default caption and is used to label the field.
- Default Value: It is used for specifying a value for new entries of data records. While entering the data item, the operator can always over write the default value. The default value should be the most frequently entered value in the field.
- Validation Rule and Text: Validation means checking of data to eliminate incorrect entries. Validation criteria can be specified for this property. If the data so entered does not satisfy the validation criteria, the data entry in the tables is not allowed. In such a case the validation text gets displayed.
- For example if you have created a table to store the marks obtained by the students who appeared in the exams having maximum marks 100, you will provide a validation rule “<=100” in the field property. If the operator tries to enter the marks more than 100 then MS Access will stop the user from entering the marks and it will flash a default message.
- If you design a validation text “Marks not Permitted” then instead of the default message MS Access will flash “Marks not Permitted”.
- Required: The Required property must be provided a logical value Yes or No. When a field’s required property is set to Yes, a user must enter data in the field before saving the record. A value of No implies that the data entry in the field is optional. In other words, a null value is also acceptable to the database.
- Indexed: Indexing a field results in speeding up sorting, searching and filtering of records on that field. Primary key field is always indexed. For a single field primary key, Access sets the Required property to Yes and the Indexed property to Yes (No duplicates) because a primary key by definition must have unique values without null entries.
- If you set Yes (No duplicates) in the Indexed property then this field value becomes unique without assigning a primary key.
- Allow-Zero Length: This property is available only for Text fields. Setting it to Yes/No determines whether a text string with zero length is a valid entry or not.
- Text align: This property aligns the text that is entered in the columns to Left, right, Center or distributed that spreads the text evenly across the width of the column. Center alignment is the default alignment.
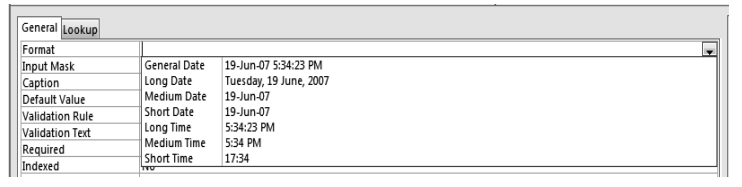
Format Property for date and time
Format determines the way that the field appears when it is displayed or printed in datasheets, or in forms or reports that are bound to the field. You can use a predefined format or build your own custom format.
The following are the predefined formats:
General Date By default, if the value is a date only, no time is displayed; if the value is a time only, no date is displayed. This setting is a combination of the Short Date and Long Time settings.
Examples
Date 4/11/12
Time 05:34:00 PM
4/1 Date and time 4/12 05:34:00 PM
Long Date Returns the date in the same format as Long Date setting in the regional settings of Windows i.e. date setting in your computer. Example of a long date: Saturday, April 21, 2012.
Medium Date Displays the dates in dd-mmm-yyyy format. For example: 3-Aug-2012.
Short Date Returns the date in the same format as Short Date setting in the regional settings of Windows i.e. date setting in your computer. Example: 4/21/12.
The Short Date setting assumes that the dates between 1/1/00 and 12/31/29 are of twenty-first century. The years are assumed to be between the years 2000 to 2029. Dates between 1/1/30 and 12/31/99 are assumed to be twentieth century dates (that is, the years are assumed to be 1930 to 1999).
Long Time Returns the time in the same format as long time setting in the regional settings of Windows i.e. time setting in your computer. Example: 5:34:23 PM.
Medium Time Returns the time in the same format as displayed by hours and minutes separated by the time separator character, followed by an AM/PM indicator. Example: 5:34 PM.
Short Time Displays the time as hours and minutes separated by the time separator, using a 24-hour clock. Example: 17:34.
Customizing the date and time format
The abovementioned date formats were the predefined formats in MS Access 2010. However, you can customize it by adopting the following settings.
| Date and time format Setting | Result Display |
| ddd”, “mmm d”, “yyyy | Mon, Jun 2, 1997 |
| mmmmdd”, “yyyy | June 02, 1997 |
| “This is week number “ww | This is week number 22 |
| “Today is “dddd | Today is Tuesday |
Lookup Properties: The lookup feature is used by a field to find its values in another table, query or from a fixed list of values. A list of valid values can be displayed using a list box or combo box. Text box is the default display control of lookup. Lookup is created in case of a field, which is foreign key (many side) into primary (one side) between the tables that have one-to-many relationship. Its other display controls are list control and combo control. When list box or combo box is used as display control in lookup, it is important to specify the row source type (that is table, query or list of values or field list). The list of values must be separated by comma. Some additional properties in case of list box or combo box are meant to specify the bound column whose values are copied to this field as references. Number of columns to appear in the list box or combo box is determined by column count property.
-
- The above steps for defining a column need be repeated for every column to be created for a particular table.
- After defining all the columns of the table, the primary key column of the table can be specified as any of the columns that are expected to have unique data values. This can be achieved by right clicking at the field to be specified as primary key followed by primary key item of right clicked window. If more than one field constitutes a primary key, select first field (of such composite primary key) by pressing and holding Ctrl key and clicking other fields (of the composite primary key) one by one in the same order in which they together constitute the primary key. This must be followed by right click at selected fields to mark the selected fields as primary key.
- Save the table design by clicking at File tab followed by click at Save option. Access responds by providing a generic default name of table. The table name provided by Access may be accepted by clicking at OK or changed by retyping another name at the input dialog box. This must be followed by clicking OK. The table stands created and appears as listed to the right of table object
Every other table, which constitutes part of the database design, may also be created in the same manner as described above.
Example 10.1: Dink Ltd. maintains a database to store pay details of its employees using the following two tables:
Employee
| Field | Description |
| Empcode | Identification of employee (Primary Key) |
| Emp_Name | Name of employee |
| Department | (finance, marketing, human resource) |
| Experience | Years of experience |
Pay_Details
| Field | Description |
| Empcode | Identification of employee (Foreign Key) |
| Bpay | Basic pay for the month |
Required:
-
- Create a data base named as “Dink Ltd.” that contains above tables on the desktop.
- While entering the data in pay details table, it must be ensured that the basic pay does not exceed ` 50,000.
- Enter records of six employees
Step 1
Go to start>>All programs>>Microsoft office>>Microsoft Access 2010
Step 2
Name the database and click on the folder to browse and locate desktop press Ok and then click on Create
Step 3
Click on View and then Design view and name the table as “Employee” and Press OK
Step 4
Set the Filed Properties
Employee Code: Text; Size-10
Employee Name: Text; Size-25
Years: Number, Size: Byte (an employee usually cannot have an experience of more than 50 years while using Byte we can enter a value up to 255)
For the field Department select Lookup Wizard as field type and follow the steps:
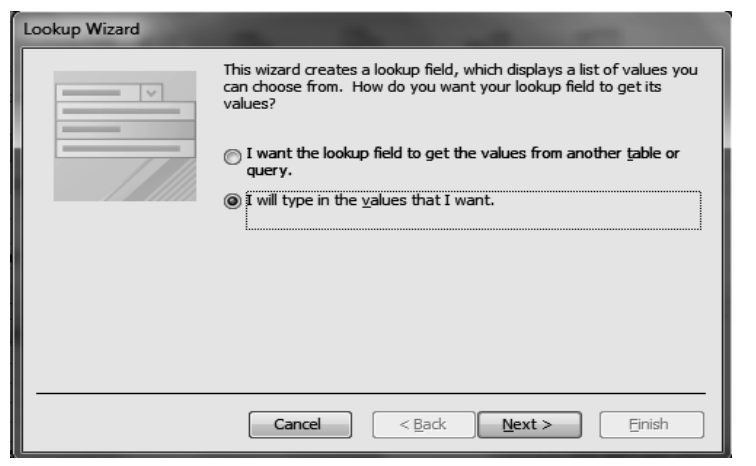
Select I want the lookup field to get the values from another table or query, if you want to list to assume fields of some other table. Since you have to type list, select I will type the values that I want.
Click Next>
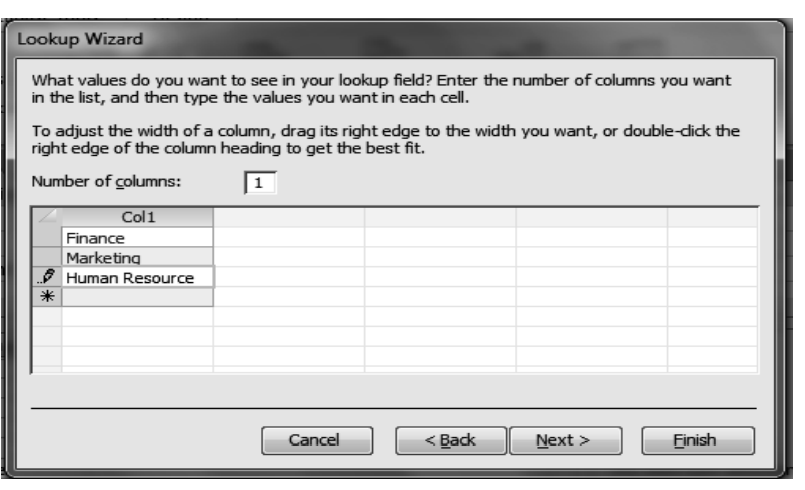
Type the values in the column. Click Next>
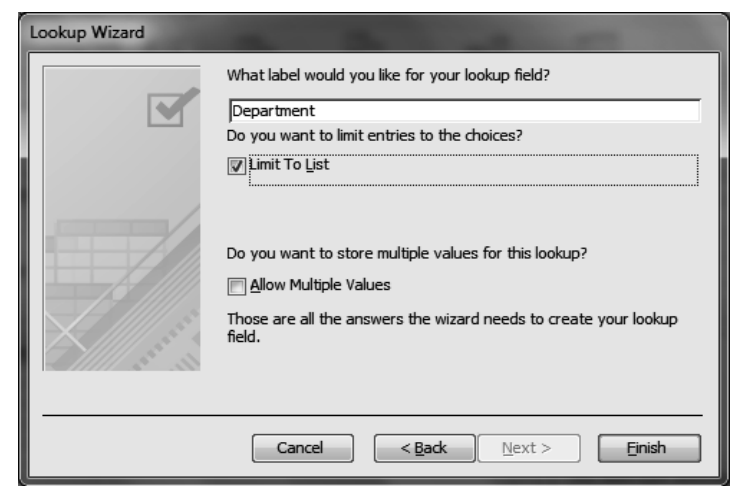
Click on Limit to List Checkbox if you don’t want to allow entering any other value than in the list. Uncheck if the entries outside the list are also allowed.
If you check Allow Multiple Values the field will become a multivalued attribute and more than one value can be entered in the same field e.g. more than one contact numbers in the same cell.
Multivalued attributes should be avoided while designing database.
Click Finish.
Step 5
Each table in the database ideally should contain a Key Attribute. To define the key attribute we assign a Primary Key. In this table the employee code qualifies for the key attribute as it cannot contain a duplicate value. To assign the primary either right click on the field and click on Primary Key option or select the field and Click on Primary Key in the Design of Table tools Tab.
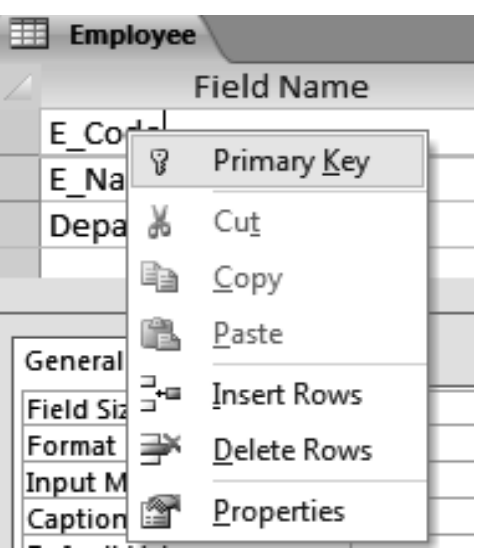
Or
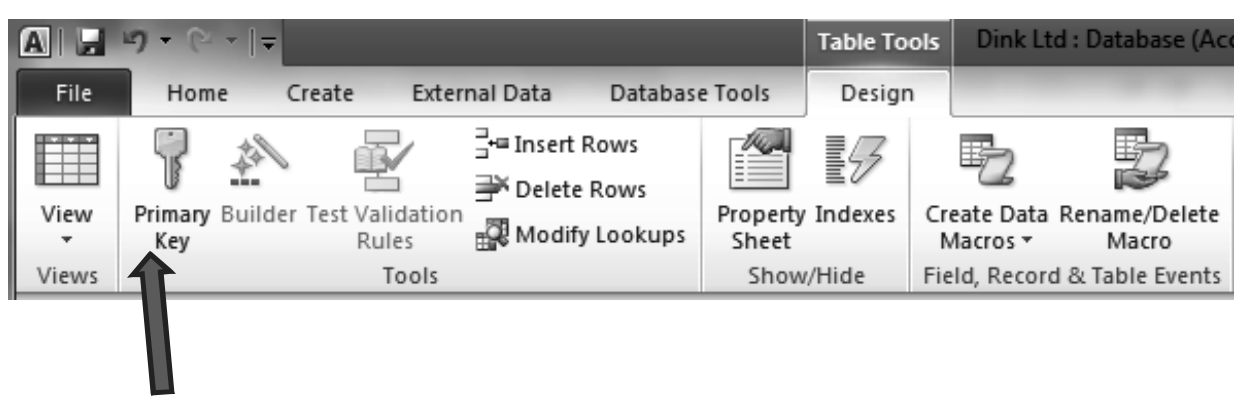
A primary key can assume neither a Null nor a Duplicate value in the table.
Step 6

After the designing is complete click the X sign of the work area to save the table design
Step 7
Click on Create Tab and Click on table design for creating the second table named as Pay_Details
Set the Filed Properties
Employee Code: Text; Size-10
Basic Pay : Currency
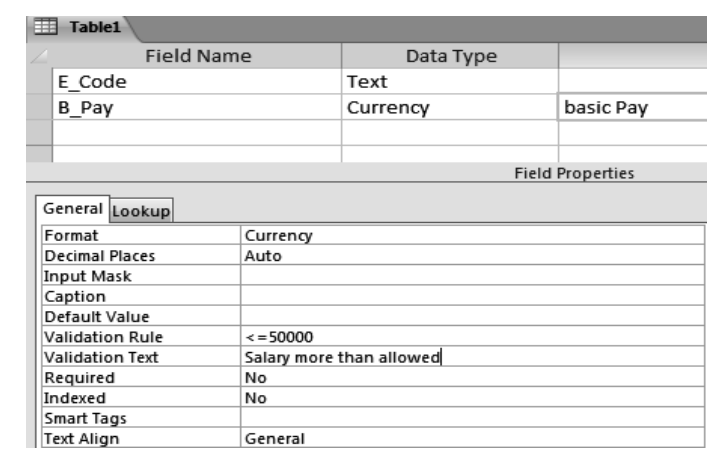
Against the Validation Rule enter <=50,000 and enter the error message in Validation Text
Step 8
Save the table by Pressing Ctrl+S and enter the name in the box that appears and then press OK.
Ignore the message that appears to define a primary key and press NO as this table doesn’t contain a primary key.
The Foreign Key cannot be implemented at the table design level rather it is an outcome of the relationship between the tables and hence it is discussed in Para 10.4
Step 9
Enter the records of the employees. To enter the records double click the table in which the data has to be entered.
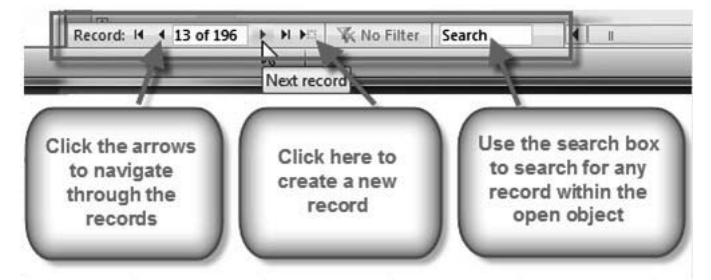
Navigating the records in the Table
Consider the following figure that shows mechanism of navigating among the records stored in a table
Adding a new Record
You can add a new record in the table by three ways
(1) Clicking on NEW in the Records group or Press (Ctrl and +) together

(2) Click New Record on the Navigation Pane of the table, or
(3) Start typing in the row below the row in which you last added a record.
Deleting a record
To delete a record select the row and right click then select Delete Record or Press (Ctrl and -) together.
Alternatively you can select DELETE in Records group. See the highlighted option in the above picture.
Saving a Record: To save a record Click the Save command in the Records group on home Tab. See the highlighted option in the above picture.
Alternatively Press Shift+ Enter together to save a record.
Editing a record
To edit any record within a table, you can simply click on the cell containing the data and edit the changes.
However, You can also use find and replace option.
To find a word press Ctrl+ F and to Replace a Word within a record press Ctrl+ H, alternatively go to Home Tab and in the Find group click on find or

Replace as the case may be. The Find and Replace dialog box will appear to you.
For example to replace Sunita with Rehman Press Ctrl+H type Sunita in Find what: and Rehman in Replace With: and then click Replace to replace the current record, Sunita, or Replace All to replace all records entered as Sunita in the database.
Modifying Table Appearance
You can modify the appearance of the table in a number of ways. Some of them are explained hereunder.
| Resizing Rows and Columns
To resize the Column place your cursor over the right gridline in the field title till the mouse becomes a double arrow and Rows. If your fields and rows are too small or large for the data contained with them, you can always resize them so that all the text is displayed. To Resize a Field: Place your cursor over the right gridline in the field title. Your mouse will become a double arrow and then Click on it and drag it to the desired level and then release the mouse. |
 |
| To Resize a row: Place your cursor over the bottom of the gridline to the left of the row till it turns into double arrow and then Click on it and drag down to the desired level and then release the mouse.
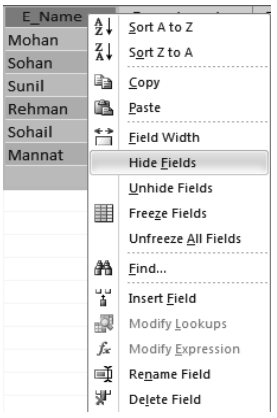
To hide a Column: Right click on the column and then click on Hide fields. To unhide a hidden Column: Right-click any field title, then select Unhide Fields. In the dialog box, click the checkboxes of the fields that you would like to make visible again and then click OK. You will notice that the checkbox against the field that is hidden is unchecked. Check this box to make the field visible again. |
 |
Sorting and filtering
Sorting and filtering are the tools provided by MS Access that provides the ability to handle the enormous amounts of data by customizing the organization and view of the data that makes it more convenient to work with.
In this lesson, you’ll learn how to sort and filter records.
Sorting Records
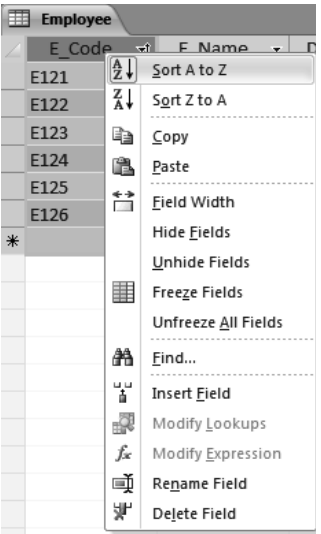
By sorting the records you can put them into a logical order, with like data grouped together. As a result, sorted data is becomes simpler to read and understand than unsorted data. By default, Access sorts records by their ID numbers. However, there are many other ways records can be sorted.
To sort data do the following:
1. Select the field name by which you want to sort the records. For illustration let’s take employee name as the basis for sorting the records.
2. Right click on the field name and select the order in which you want to sort ascending or descending.
Or
2. Click on Ascending or Descending in Sort & Filter group on Home tab.
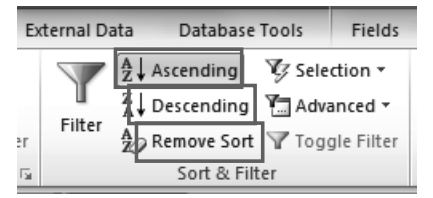
To remove sorting of the data click on Remove Sort command in Sort & Filter group
Filtering Records
Filter command allows the users to view only the data that a user wants to see. When you set a filter criteria for the data that you want to display, then the filter searches all of the records in the table, finds and displays the ones that meet the set criteria and temporarily hides those records that don’t meet the criteria.
Filters are useful, as they allow you to focus on specific records without being distracted by the data in which you are not interested.
For example, suppose that we just want to see the details of the employees who belong to Marketing department then we can set the filter rule that will only display records of Marketing department.
To create the filter:
1. Select the field to which a filter rule is to be set
2. Either right click or click on Filter in Sort and Filter group on the Home tab
3. Uncheck the irrelevant text items and the relevant text item should remain checked
4. Press OK

In the drop-down menu that appears
Select and deselect items one at a time by clicking their checkboxes. Click Select All to include every item in the filter. Clicking
-
-
- Select All if you want to select all items.
- Click Blank to set the filter to find only the records with no data in the selected field.
-
Disclaimer: The content/information published on the website is only for general information of the user and shall not be construed as legal advice. While the Taxmann has exercised reasonable efforts to ensure the veracity of information/content published, Taxmann shall be under no liability in any manner whatsoever for incorrect information, if any.

